
While camcorders might not be as popular as they used to be, they’re still a great handheld option to capture high-quality video and photos. If you’ve never used one before, don’t worry! It might seem complicated, but with some patience, you’ll be working your camcorder like a pro in no time. As an added bonus, most camcorders can hook up to computers and work like webcams, so you can get much crisper video for your work calls or streams.
StepsMethod 1Method 1 of 3:Setting Up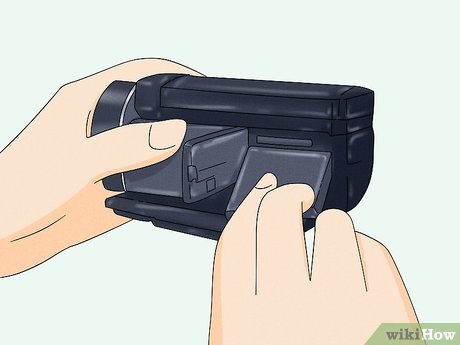
1Attach the battery pack to power up your camcorder. Camcorders usually come with a removable, rechargeable battery pack. Press the battery pack into the battery slot, usually on the back of the camcorder, until it clicks to power the camera.XIf your camcorder is new, you’ll probably have to charge the battery. Plug it in and let it fully charge before setting up your camcorder.On some camcorders, you have to adjust the viewfinder to fit the battery into the slot. Check the instructions to confirm the right steps.Camcorder batteries usually last 1-3 hours before needing a recharge. It’s helpful to carry an extra battery pack and your charger with you if you need more power.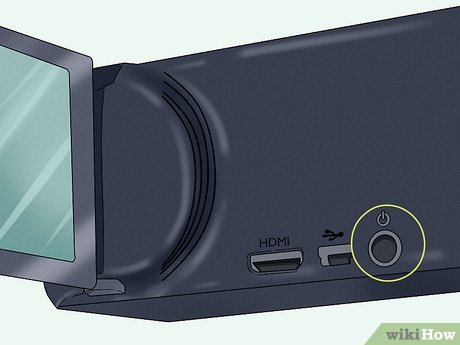
2Turn the camera on with the Power button. To set up your camera, of course, you have to turn it on first. Hit the Power button and the display should light up.XThe Power button is usually under the LCD screen, so open that up to access all the controls.If the camcorder won’t turn on, double-check to make sure the battery is connected properly. If it is, then you might have to charge it more.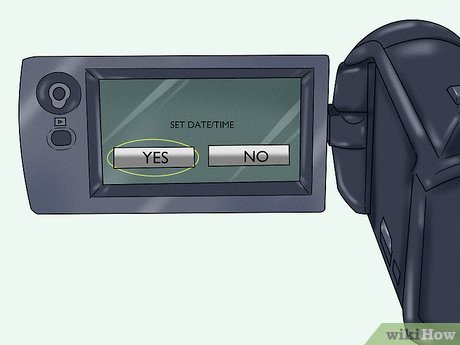
3Set the date, time, and language options. If you’re turning on your camcorder for the first time, then the LCD screen will probably bring up a list of settings automatically. You’ll have to type in the date and time, as well as the language. Type in today’s date and the current time on the touchpad so the information is all accurate. Then select your preferred language so you can understand all the instructions and settings.XIf the camcorder isn’t new but you want to readjust the settings, then hit the Menu button on the keyboard or on the LDC screen to find the settings options. Then scroll to the setting that you want to change, like the time.There may be a few other options to set, like the geographic area and time zone.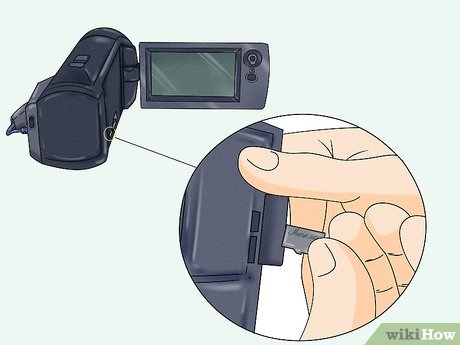
4Insert the memory card so you can capture images and video. Camcorders use memory cards to store your videos. Usually, there is a flap on the camcorder that pops open. Slide the memory card into the slot until it clicks to lock it in place.XIf the memory card doesn’t click, then you’re probably putting it in the wrong way. Flip it around and try again.Standard camcorder cards usually hold 2 GB of memory, or 30-60 minutes of video, depending on the quality.You can usually get extra memory cards up to 32 GB if you need more storage space. This should give you several hours of memory.Method 2Method 2 of 3:Capturing Video and Photos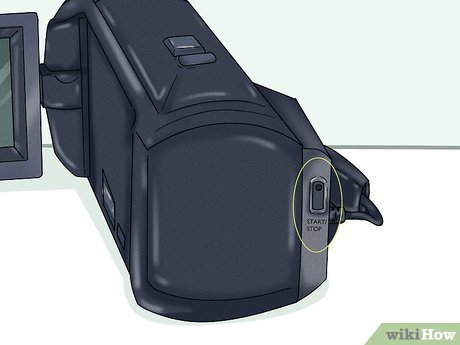
1Press Start/Stop to begin recording. On most camcorders, just point at whatever you want to capture and hit the Start/Stop button to start recording. When you’re finished, hit that same button again to stop recording.XYour camcorder may use a different label for the record button, so always check your instruction manual first.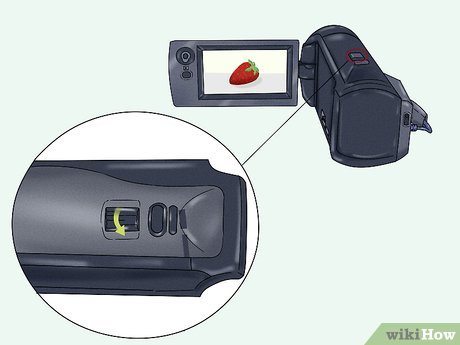
2Zoom in and out with the Zoom knob. If you want to get a clearer view of something you’re recording, then use the Zoom knob. Simply turn the knob one direction to zoom in, and turn it the other direction to zoom out.XSome camcorders use buttons instead of a knob to zoom. One button zooms in and the other zooms out.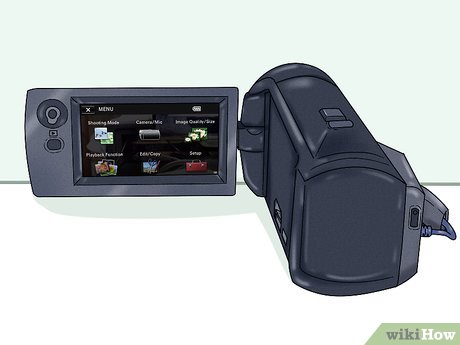
3Press the Play button to view your video. When you want to check on what you’ve recorded, just enter playback mode on the camcorder. Usually, you’ll do this by pressing the Play button on the touchscreen. Then select the video you want to watch and it will play on the LCD screen.XIf a button isn’t labeled Play, then it might have a sideways triangle instead. Look for this if you can’t find the play button.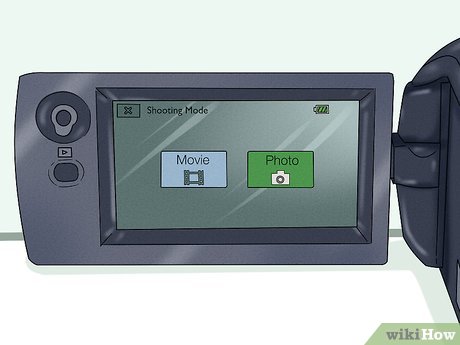
4Set the mode to Photo to capture still pictures. Camcorders can also capture regular photos. Hit the Mode button and select Photo to switch the camera setting. Then hit the Photo button to capture still pictures.XSome models have an automatic focus feature. Hit Photo lightly to focus in, then press it down to capture the picture.Some camcorders can capture still photos while recording video at the same time. In this case, just hit the Photo button to snap a picture.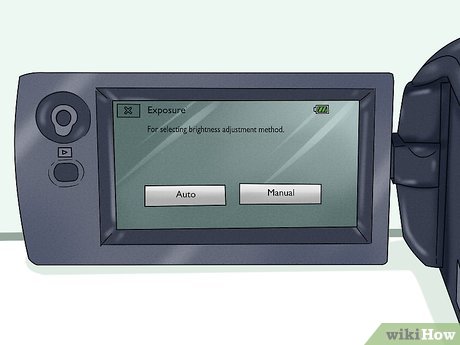
5Adjust the brightness if you want to get a clearer image. You have all kinds of control options for your camcorder. If you’re in a dark area, then raise the brightness by opening up the camera’s aperture and let more light in. Do the opposite if you’re in a bright area. The camcorder should have a knob or button for brightness.XDifferent camcorders have different control options, so always check your manual if you aren’t sure what to do.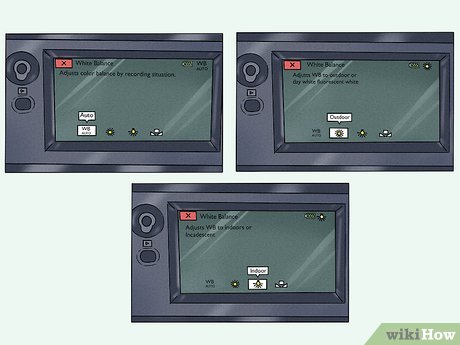
6Change the white balance if your image looks too blue or orange. The camera’s white balance adjusts how much color is in the image. Most camcorders self-adjust to the environment, but if your image looks too blue or orange, then the balance is a little off. Toggle your white balance control on your camcorder to let in more natural light and balance out the image color. Most camcorders have a few settings you can scroll through to see what you like best.XOn some camcorders, you can manually adjust the white balance by pointing the camera at a white piece of paper and toggling through the balance adjustments. Pick the setting that makes the paper look perfectly white, indicating that your white balance is perfect.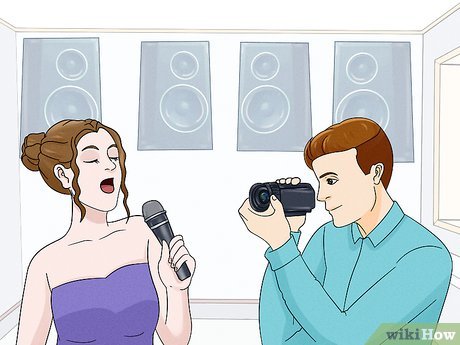
7Stay close to what you’re recording to capture good sound. Camcorders have onboard microphones, so you can capture sound with them as well. However, the sound quality falls as you get further away from what you’re recording. If you want good sound quality, stay within a few feet of the what you’re recording so avoid picking up interference.XYou could also plug an external microphone into the camcorder to get better sound quality. You can get wireless models online, so the person you’re trying to record can speak into the microphone from far away.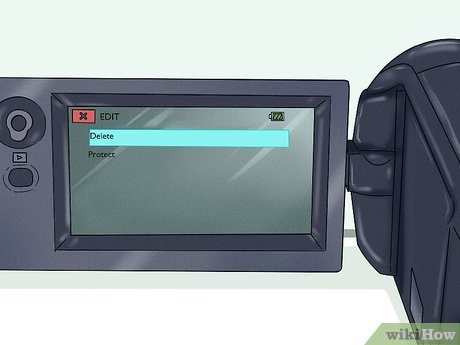
8Open the menu to delete images or videos. You won’t love everything you capture with your camcorder. To review your images and videos, open the menu and select your past captures category. Scroll through what you’ve captured and see what you like. Press on items that you want to get rid of and press delete or the garbage can symbol to get rid of them.XIf your camcorder doesn’t have a touchscreen, then use the arrows to navigate and select the images you want to view.Always double-check the instructions for your camcorder to make sure you don’t delete anything you wanted to keep.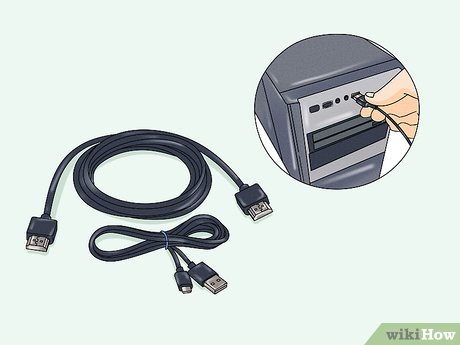
9Transfer images or videos to your computer with an HDMI or USB cable. You can also save everything on your camcorder to your computer. Camcorders use HDMI or USB ports, so get the right cable for your device. Then plug it into your computer and select the images you want to save. Copy and paste them into a file on your computer.XIf you aren’t sure which cable you need, look at the port on your camcorder. Usually, you’ll see “HDMI” or “USB” printed in small letters next to it. You can also tell because USB ports are perfectly rectangular, while HDMI ports are rounded in at the bottom edges. When in doubt, check your manual or look online for your camcorder model.It’s a good idea to delete items from your memory card after you save them to your computer. That way, you won’t run out of space on your camcorder while you’re trying to record.You might also be able to plug your camcorder’s memory card directly into your computer. This way, you won’t need a cable.Method 3Method 3 of 3:Webcam Settings
1Download a streaming application to connect with your camcorder. Streaming apps let you adjust your camcorder settings from your computer and capture video. Search for a streaming app that’s compatible with your camera model. Most of these are free. Download and open the program to get your camcorder set up.XSome popular streaming apps include Open Broadcaster Software (OBS), Wirecast, or VMix. All of these programs support camcorder use, so pick the one that is most compatible with your operating system.This also works with platforms like Zoom or Skype, so you can use your camcorder for work calls.Some camcorder companies have their own streaming apps that you can download, so check your manual to see if yours has a compatible app.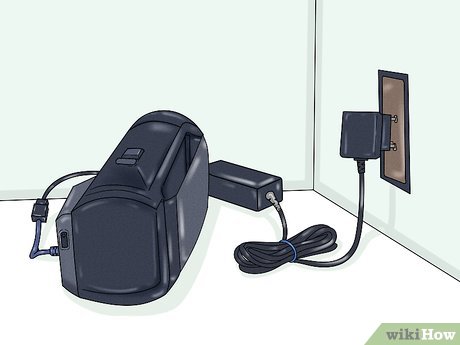
2Plug your AC adapter into your camera and a wall outlet. Connect the adapter to your camcorder battery and plug the other side into a wall outlet. This keeps your camcorder powered so it won’t die while you’re using it as a webcam.XIf you don’t have an AC adapter, make sure your battery is fresh and charged before getting started.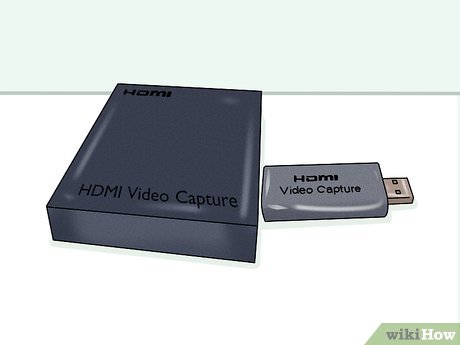
3Get an HDMI capture card if you want high-definition video. If you’re just using your camcorder as a webcam to chat with, then you probably don’t need a capture card. However, a capture card helps make the content sharper and improves the frame rate, so you can capture high-definition video. This is useful for crisp content and video game streaming, particularly. If you want higher-quality video, then get a capture card and plug it into your USB port.XYou can get capture cards from electronics stores or online.Some capture software can work without a capture card too. Check reviews for the software you’re using to see if it’s necessary.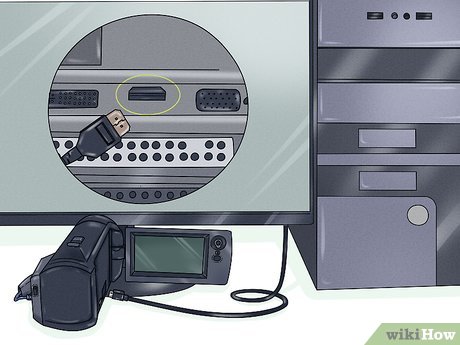
4Connect your camera to the computer with an HDMI cable. A standard HDMI cable hooks your camcorder to your computer. Plug one end into your camcorder’s output port and the other into your computer’s HDMI port.XCamcorders started having HDMI outputs in the early 2000s, so yours should have one if it’s 10 years old or less. However, if you have an older model without an HDMI output, then you, unfortunately, can’t hook it up to your computer.If you’re using a capture card, then plug into the capture card rather than the HDMI port.Some camcorders use a USB connection instead of HDMI.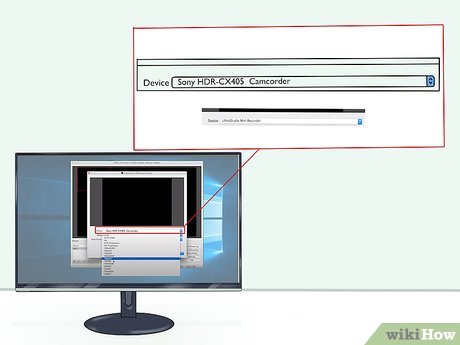
5Open your streaming software and select your camcorder. Once you’re all hooked up, select and open the software or streaming platform you’re using. Go to the options settings and look for the option to find or connect a device. In most cases, the default will be your computer’s built-in webcam, so de-select that and click on your camcorder. Then you can start capturing images through it.XSome apps might immediately recognize your camcorder without any extra steps.Usually, the camcorder will appear as the company brand and model, like Canon, so look for this if you can’t find your camcorder to select.Turn your camera display data off if you don’t have clean HDMI output. This way, your feed won’t show things like your battery life or the date and time. These options should be in your camcorder’s settings.X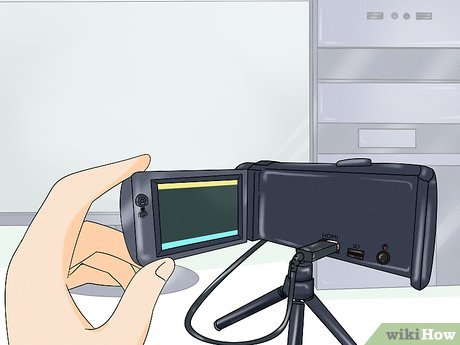
6Arrange your camera so it captures a good view of you. As a last step, make sure you’re in the camera frame so your viewers can see you clearly. Either set your camera on a shelf behind your computer or prop it up with books or anything else you have handy. Just make sure the image is clear and stable.XSome people also like to use a tripod for a better view.


