
A tie dimple refers to the small indent in the center of a tie near the top of the knot. It adds another dimension to your outfit by giving your tie a little personality and class. A dimple can be applied to any type of necktie knot, although they tend to naturally occur with Eldridge, Capsule, and Nicky knots. To add your dimple, tie your tie the way you normally would, and stop right before you get to the part where you tighten the knot. Then, you can choose to add your dimple from the top or bottom of the knot.
StepsMethod 1Method 1 of 3:Tying Your Tie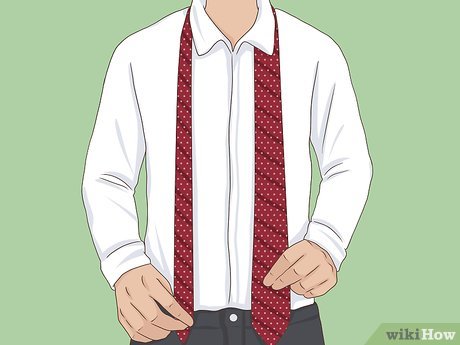
1Choose your necktie and set the length before making the knot. Select the necktie you think that goes best with your outfit. Line the blade and tail up over your shoulders to set the length. Then, begin to assemble the knot. A dimple is easily added to any kind of knot, so it doesn’t matter which particular knot you choose.XThe blade refers to the larger piece of fabric that hangs in front. The tail is the skinnier piece of the tie that sits behind the blade.
Tip: A dimple can be added to any knot, although it’s easiest to add them to simpler knots, like the Windsor, Half-Windsor, and Four-in-Hand. The Eldridge, Capsule, and Nicky knots are all prone to dimpling to begin with, so you may not need to add one.
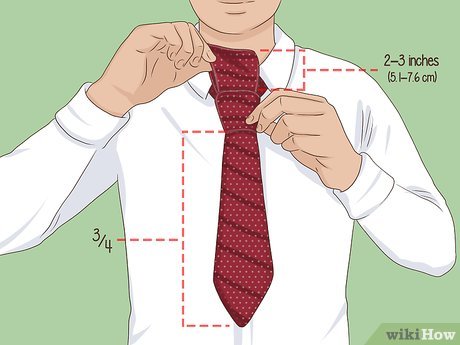
2Stop tying the tie at the point where you’re about to secure the knot. When you get to the part where you pull the blade down all the way through the knot to tighten the tie, stop. Slide the blade 3/4 of the way through the knot and gently let the tie hang. Leave at least 2–3 inches (5.1–7.6 cm) of space between the portion of the blade looped over the knot and the top of the knot itself.XMaintain enough slack in the blade and knot to reach in between the space where the front portion of the knot covers the blade.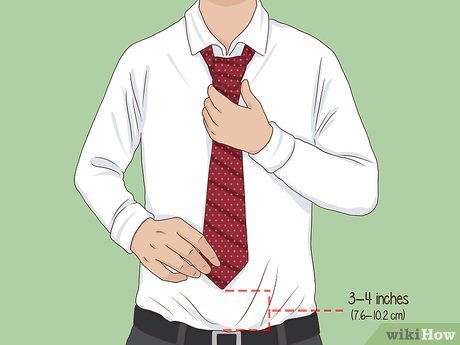
3Line your tie up and check the length before adding the dimple. Make sure that the knot is assembled perfectly and that the blade is at the perfect length before proceeding. The bottom of the blade should rest over your belt buckle, so if there is 2–3 inches (5.1–7.6 cm) of space remaining between the top of the blade and the knot, your blade should be hanging roughly 3–4 inches (7.6–10.2 cm) above the belt buckle.XYou cannot add a dimple after tightening your necktie, and the dimple won’t look nearly as good if you loosen the knot after adding it to adjust the length of your tie.If you need to reassemble the knot or adjust the length, repeat these steps to create a new knot.Method 2Method 2 of 3:Folding the Dimple from Above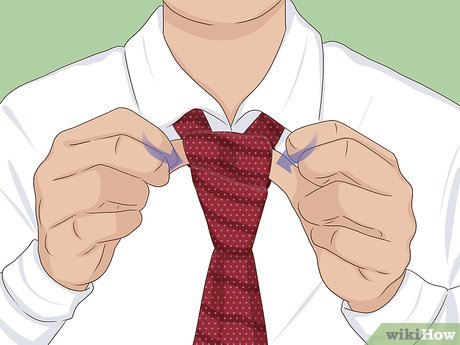
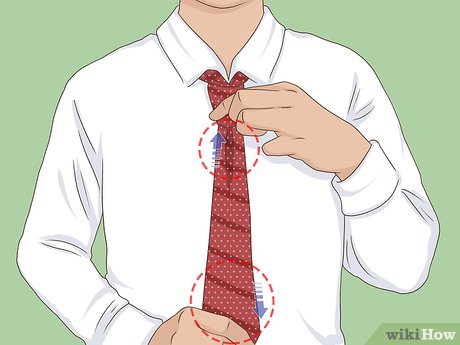
1Slide your thumbs under the loop on top of the knot. Insert your thumbs underneath the portion of the blade that is loosely sticking out the top of the knot. Orient your palms to face up so that you’re holding the loop with the pads of your thumbs. Keep your hands as symmetrical as possible for an even dimple.XFolding the dimple from above is a little easier than adding it from below, but you have less control over the size of the dimple.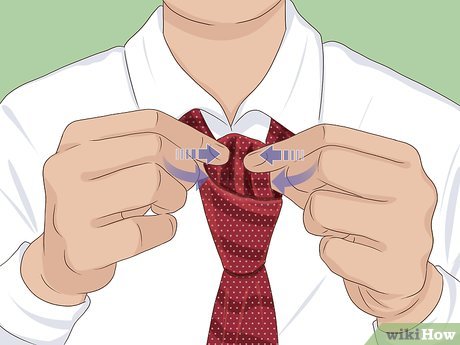
2Pinch the fabric inwards using both index fingers. Slide your index fingers over your thumbs and pinch them inwards to add a seam to the loop. Transfer your grip on the loop to your nondominant hand and hold the loop in place.XYou don’t need to squeeze hard to hold the dimple in place.
3Slide the blade down through the knot. Grab the blade just underneath the knot with your dominant hand. Maintain the dimple with your nondominant hand. Slowly pull the blade down to tighten your knot.X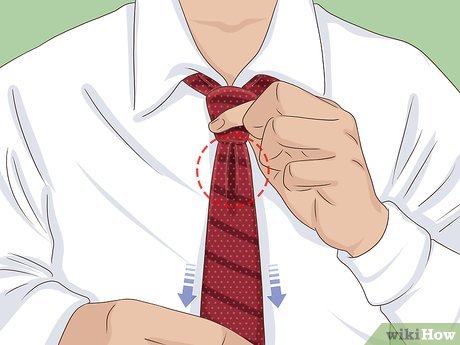
4Secure the dimple by sliding it through the back of the knot. While you’re pulling the blade down to tighten it, maintain the dimple with your nondominant hand. Slide the dimple through the front of the knot. The dimple will slide behind the front of the knot and emerge underneath it. Pull the blade all the way through to tighten your tie and secure the dimple.XThe dimple should sit in the middle of your tie. If it isn’t, you may be able to adjust the tie by pulling the indentation in the dimple to the left or the right.Method 3Method 3 of 3:Adding the Dimple from Below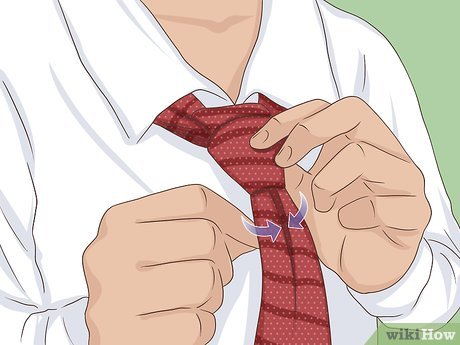
1Pinch the center of the blade just below the knot with your index finger. Grab the edges of your blade just beneath the loose knot. Use your index finger to apply pressure to the center of the fabric and add your dimple. Hold the fabric in place with your thumb and middle finger while maintaining the dimple with the index finger on the same hand.XSome people use their nondominant hand to do this while other people prefer their dominant hand. Do whatever feels most comfortable to you.Adding the dimple from below requires a little more dexterity, but you have more control over the location and the size of the dimple.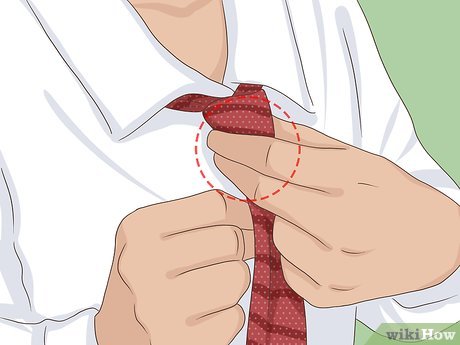
2Grip the sides of the knot gently with your other hand. Use your free hand to grab the edges of the knot by the bottom edge of the fabric. Do not squeeze or pull on the knot—the goal here is to simply stabilize it while you tighten your tie.XMost people naturally squeeze the knot a little when they normally their tie. Resist the urge to do this, since the dimple will be harder to hold in place if you don’t leave yourself some room inside of the knot.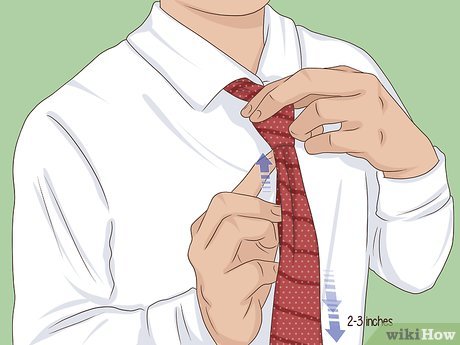
3Pull the blade down 1–2 inches (25–51 mm). Begin pulling the blade down to tighten your tie using whatever hand you’re holding the dimple with. After pulling the tie down 1–2 inches (2.5–5.1 cm), slide your index finger up towards the knot to move the dimple upwards.X
Variation: For a really pronounced dimple, slide your index finger on your knot-holding hand down in between the front of the knot and the blade. This will help hold the dimple in place from both sides of the knot, and pressing down from above the knot while you pull the blade down from below will result in a bigger indentation.
4Tighten your tie slowly while sliding the dimple up the blade. Use your other hand to brace the knot and keep the shape of your tie. Continue pulling the blade down and sliding the dimple up until your tie is tight.XIf the angle of the dimple looks a little off, gently tug the fabric under your knot to adjust the shape of your dimple.


